 HioBuy
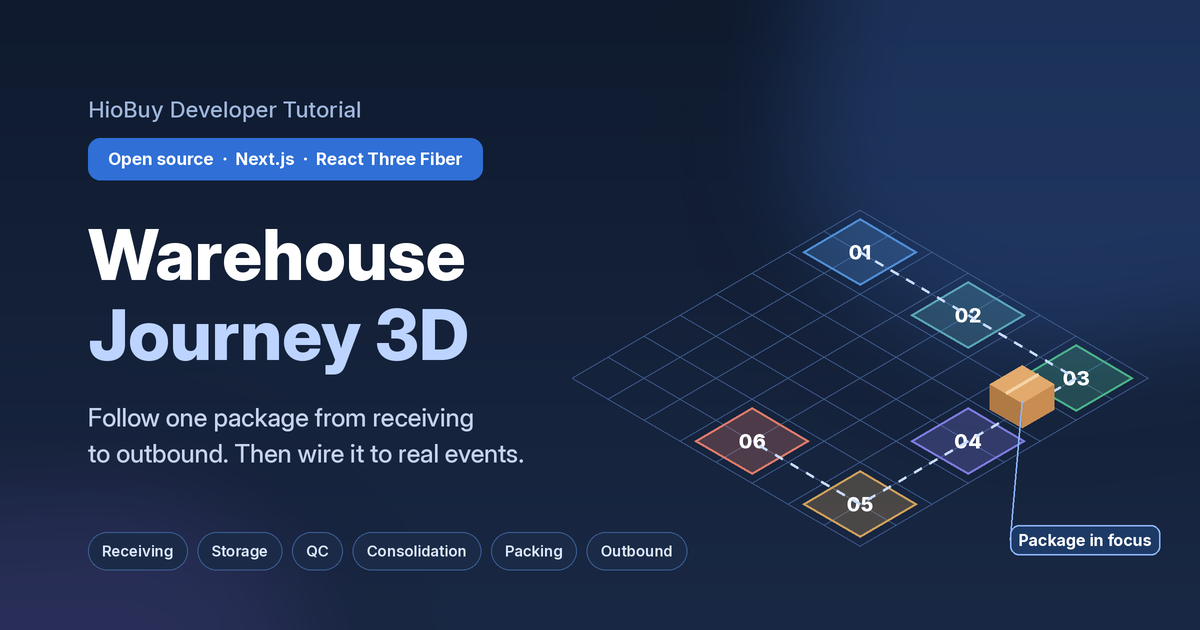
Warehouse Journey 3D: Visualize Fulfillment, Then Wire It to Package Events
An open-source Next.js + React Three Fiber demo that follows one package from receiving to outbound. Run it, rebrand it, deploy it on Cloudflare, and map its six stages to HioBuy package tracking events.
Warehouse Journey 3D: Visualize Fulfillment, Then Wire It to Package Events
Most fulfillment UIs are tables: a package ID, a status badge, a timestamp. That works for operators. It works less well when you need to explain to a buyer, a merchant, or a new teammate what actually happens to a parcel inside a China warehouse.
Warehouse Journey 3D is an open-source experiment from the HioBuy team. It renders a small fulfillment center in the browser and follows one package through six stages:
Receiving → Storage → QC / Inspection → Consolidation → Packing → Outbound
Live demo: warehouse.demo.hiobuy.com (best on desktop).
This tutorial covers three things:
- Run and rebrand the demo locally.
- Deploy it as static assets on Cloudflare Workers.
- Replace the scripted journey with real package state from the HioBuy Fulfillment API.
What you are building
The repository ships as a visual prototype. It uses mock data and scripted animation. It needs no backend, no database, and no HioBuy API key.
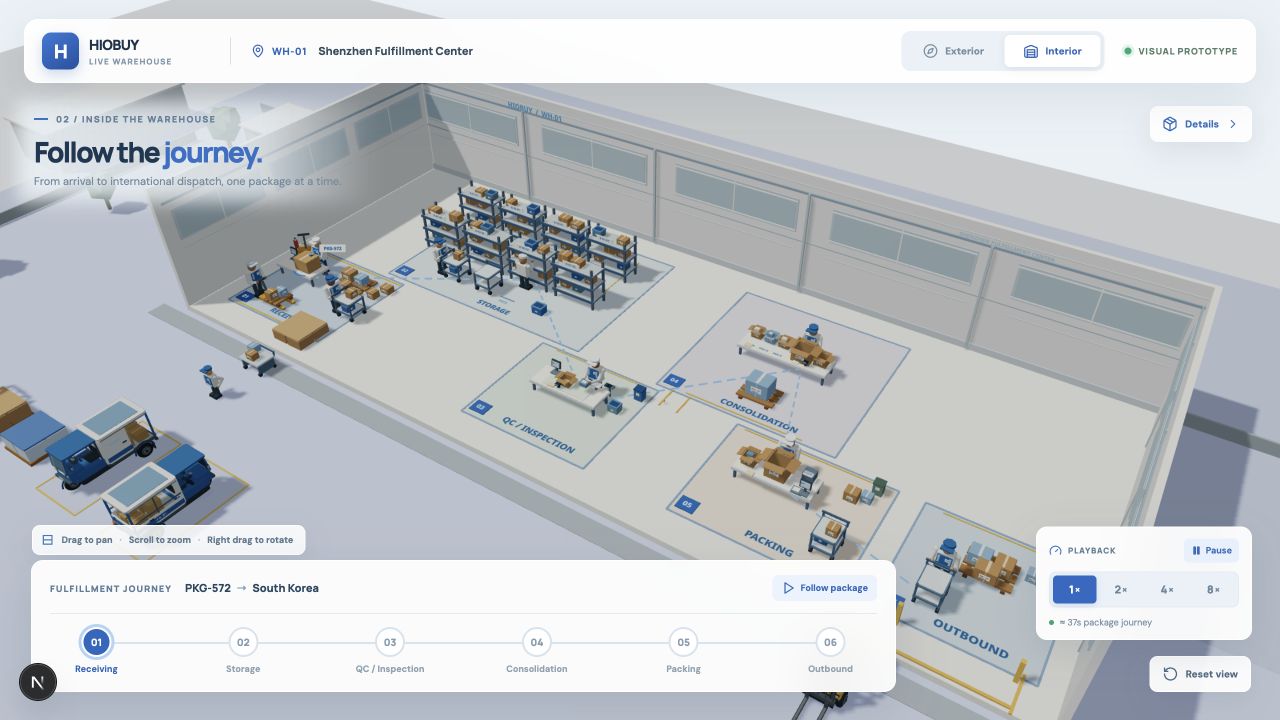
What you get out of the box:
- Exterior campus view and interior warehouse view
- Six labeled zones: Receiving, Storage, QC / Inspection, Consolidation, Packing, Outbound
- Follow package camera mode, plus a journey bar that shows the current stage
- Trucks, courier tricycles, forklifts and workers on a shared simulation clock
- Playback at 1× / 2× / 4× / 8×, with Pause / Resume (useful for recording)
Stack: Next.js, TypeScript, React, React Three Fiber, Drei, Three.js.
How the project is structured
The scene is intentionally separated from the data that drives it:
Mock Fulfillment Data
        ↓
Warehouse State
        ↓
Scene Objects
        ↓
React Three Fiber
        ↓
Three.js / WebGL
        ↓
UI Overlay
The relevant folders:
src/
  app/          Routes, page layout, global styles
  components/   3D scene, miniatures, camera, UI controls
  config/
    demo.ts     Shared brand name and wordmark sizing
  data/         Mock fulfillment data and operation timing
The journey stages live in src/data/warehouse.ts as zones. Each zone has a stable id:
// src/data/warehouse.ts (excerpt)
export const zones: FulfillmentZone[] = [
  { id: "receiving",     name: "Receiving",       number: "01", /* … */ },
  { id: "storage",       name: "Storage",         number: "02", /* … */ },
  { id: "qc",            name: "QC / Inspection", number: "03", /* … */ },
  { id: "consolidation", name: "Consolidation",   number: "04", /* … */ },
  { id: "packing",       name: "Packing",         number: "05", /* … */ },
  { id: "outbound",      name: "Outbound",        number: "06", /* … */ },
];
Those six ids are the contract you will map real data onto later.
Step 1: Run it locally
git clone https://github.com/hiobuy/warehouse-journey-3d.git
cd warehouse-journey-3d
npm install
npm run dev
Open http://localhost:3000.
Controls:
| Action | Control |
|---|---|
| Pan | Left mouse drag |
| Zoom | Mouse wheel |
| Rotate | Right mouse drag |
| Inspect an object | Click |
| Switch view | Exterior / Interior |
| Follow the package | Follow Package |
| Playback speed | 1× / 2× / 4× / 8× |
Step 2: Put your own brand on the warehouse
Branding is one value. src/config/demo.ts reads it at build time:
// src/config/demo.ts
export const BRAND_NAME = process.env.NEXT_PUBLIC_BRAND_NAME?.trim() || "HIOBUY";
BRAND_NAME feeds the header, the warehouse signs, the vehicle wordmarks and the page title. Set it in .env.local:
cp .env.example .env.local
# then edit:
NEXT_PUBLIC_BRAND_NAME=YourBrand
Restart npm run dev after changing an environment variable. Because NEXT_PUBLIC_* values are inlined at build time, a public deployment needs a fresh build after a brand change. Long names shrink automatically to fit the signs.
Step 3: Deploy to Cloudflare Workers (static assets)
The scene runs entirely in the browser, so the repo deploys as a static export.
npm run build:cloudflaresetsCLOUDFLARE_BUILD=1, which switchesnext.config.tstooutput: "export"and writes the site toout/.wrangler.jsoncpublishesout/with Workers Static Assets and binds a custom domain.
Before deploying to your own account, edit wrangler.jsonc: change the Worker name, your account_id, and the routes pattern for your domain. Then:
npx wrangler login
npm run deploy   # rebuilds the static export, then runs wrangler deploy
Stop npm run dev first. Both commands use the same .next directory.
Step 4: Replace mock data with real package state
The demo does not call HioBuy. To make the journey reflect a real parcel, add a small server-side adapter that reads package state from the HioBuy Fulfillment API and returns a stage id the scene already understands.
The architecture
Browser (Warehouse Journey 3D, static)
        │  GET /journey/:packageId
        ▼
Your backend (Worker, Node, etc.)  ← holds the HioBuy API key
        │  GET /v1/fulfillment/packages/{package_id}/tracking
        ▼
HioBuy Fulfillment API
        │  events[].code
        ▼
Adapter: event codes → zone id
        │
        ▼
{ stage: "consolidation", status: "CONSOLIDATED" }
Two constraints shape this design:
- API keys stay on the server. HioBuy keys must not be exposed in browser JavaScript (Authentication). The 3D app is a static bundle, so it needs a separate backend endpoint.
- Static export has no API routes. With
output: "export", Next.js route handlers are not deployed. Put the adapter in a separate Worker or in your existing backend.
The Fulfillment API also requires your app to be in warehouse fulfillment mode. Self-fulfillment apps receive 403 FULFILLMENT_MODE_NOT_SUPPORTED.
Map package signals to the six zones
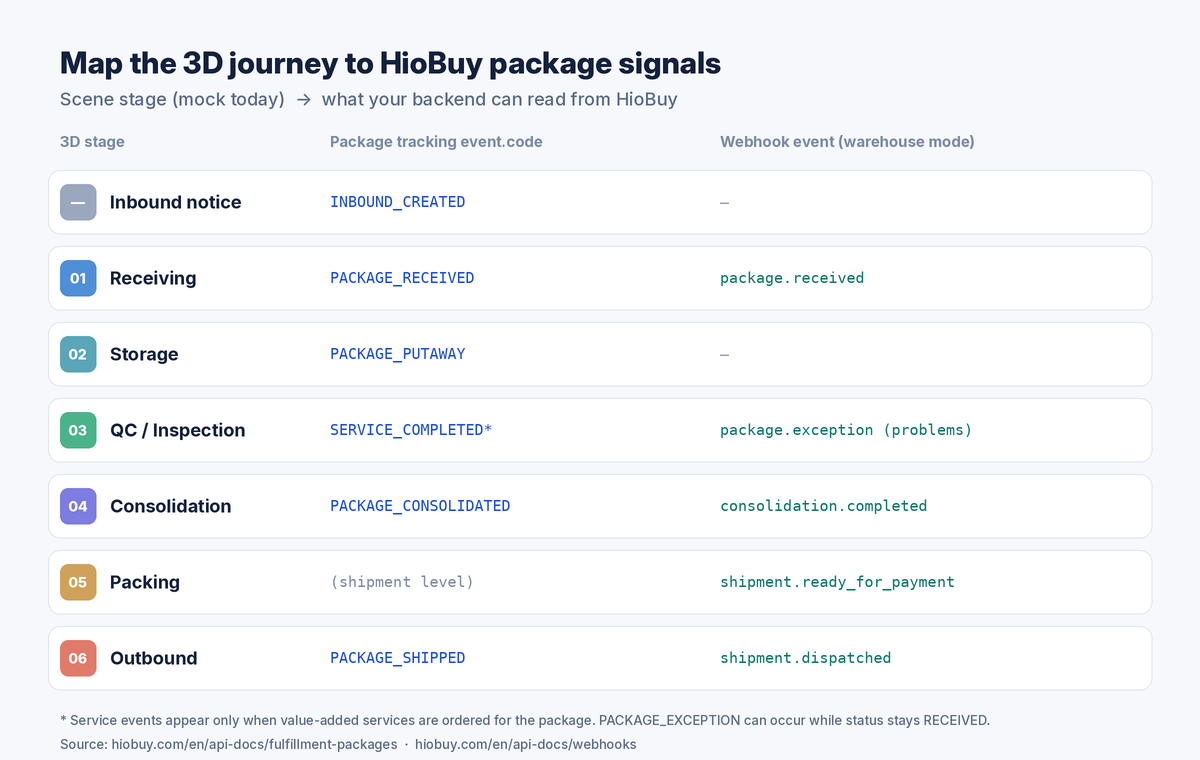
GET /v1/fulfillment/packages/{package_id}/tracking returns the HioBuy fulfillment timeline for one package. Each event has a stable code. The docs say to branch UI on event.code, never on title or description (Packages).
| 3D zone | Signal you can use | Notes |
|---|---|---|
| (before Receiving) | INBOUND_CREATED | Inbound notice exists; parcel not yet at the warehouse. Show nothing, or show a truck "arriving". |
receiving | PACKAGE_RECEIVED | Package status becomes RECEIVED. |
storage | PACKAGE_PUTAWAY | Status stays RECEIVED. |
qc | Service events such as SERVICE_COMPLETED | Only present when value-added services were ordered for the package. |
consolidation | PACKAGE_CONSOLIDATED | Status becomes CONSOLIDATED. |
packing | Shipment status WAIT_PAYMENT or later | Packing is a shipment-level step. shipment.ready_for_payment fires when warehouse packing and final charges are complete. |
outbound | PACKAGE_SHIPPED | Status becomes SHIPPED. |
Two details matter:
- Stage and problem are separate.
PACKAGE_EXCEPTIONcan occur while the lifecycle status staysRECEIVED. Render exceptions as an overlay (a red marker on the package), not as a stage. - Not every package emits every event. A package with no value-added services has no service event. Use "highest stage reached", so a later event implies earlier stages are done.
Example adapter (TypeScript)
This is example code for your backend, not part of the repository. It uses the documented tracking response shape (package_id, status, events[].code).
// journey-adapter.ts — runs on your server, never in the browser
type ZoneId = "receiving" | "storage" | "qc" | "consolidation" | "packing" | "outbound";

const ORDER: ZoneId[] = ["receiving", "storage", "qc", "consolidation", "packing", "outbound"];

// Package tracking event.code → zone reached
const CODE_TO_ZONE: Record<string, ZoneId> = {
  PACKAGE_RECEIVED: "receiving",
  PACKAGE_PUTAWAY: "storage",
  SERVICE_COMPLETED: "qc",
  PACKAGE_CONSOLIDATED: "consolidation",
  PACKAGE_SHIPPED: "outbound",
};

// Shipment statuses that mean packing is done
const PACKED_SHIPMENT_STATUSES = new Set(["WAIT_PAYMENT", "WAIT_SHIP", "SHIPPED", "SIGNED"]);

export function zoneFromTracking(
  events: { code: string }[],
  shipmentStatus?: string,
): ZoneId | null {
  let reached = -1;
  for (const e of events) {
    const zone = CODE_TO_ZONE[e.code];
    if (zone) reached = Math.max(reached, ORDER.indexOf(zone));
  }
  if (shipmentStatus && PACKED_SHIPMENT_STATUSES.has(shipmentStatus)) {
    reached = Math.max(reached, ORDER.indexOf("packing"));
  }
  return reached >= 0 ? ORDER[reached] : null; // null = not received yet
}

export async function getJourney(packageId: string, apiKey: string) {
  const res = await fetch(
    `https://api.hiobuy.com/v1/fulfillment/packages/${encodeURIComponent(packageId)}/tracking`,
    { headers: { Authorization: `Bearer ${apiKey}` } },
  );
  if (!res.ok) {
    const err = await res.json().catch(() => ({}));
    throw new Error(`${res.status} ${err?.error?.code ?? "UNKNOWN"} ${res.headers.get("x-request-id") ?? ""}`);
  }
  const body = await res.json();
  return {
    packageId: body.package_id,
    status: body.status, // PENDING | RECEIVED | CONSOLIDATED | SHIPPED | …
    stage: zoneFromTracking(body.events ?? []),
    hasException: (body.events ?? []).some((e: { code: string }) => e.code === "PACKAGE_EXCEPTION"),
  };
}
On the client, fetch /journey/:packageId from your backend and use stage as the target zone for the existing journey animation, instead of the scripted timer. Keep the scripted mode as a fallback for marketing pages and recordings.
If you also want the Packing stage, read the package's linked shipment (the package list row includes shipment.shipment_id) and pass the shipment status into zoneFromTracking. Shipment statuses are PENDING → WAIT_PAYMENT → WAIT_SHIP → SHIPPED → SIGNED, with CANCELLED on cancel (Shipments).
Polling vs webhooks
- Polling: call your
/journeyendpoint when a user opens the package view, and cache the result briefly on your backend. This is the simplest option. - Webhooks: in warehouse mode, HioBuy can push
package.received,package.exception,consolidation.completed,shipment.ready_for_payment,shipment.dispatchedandshipment.deliveredto your HTTPS endpoint. Verify theHioBuy-Signatureheader, deduplicate on eventid, store the latest stage, and let the 3D view read it. The docs note that live warehouse-to-developer push is rolled out progressively, so validate your receiver with Send test in the Developer Portal (Webhooks).
For a working receiver, see the HioBuy webhooks demo on Cloudflare.
Test against sandbox first
Package endpoints are mock in sandbox. The docs' tracking example uses the sandbox package sb_pkg_shipped, whose events run from INBOUND_CREATED to PACKAGE_SHIPPED. Call it with a test key and confirm your adapter returns outbound before you point it at live packages.
Important considerations
- Package tracking is not international tracking. Package tracking covers inbound → warehouse → consolidate → ship. Flight, customs and last-mile events come from shipment tracking. The 3D scene ends at Outbound; use a separate view for the international leg (see the tracking demo tutorial).
- Use your own identifiers carefully. Package detail and tracking accept the HioBuy
package_id(pkg_*) or a supported developer-provided external identifier. Numeric-only values are reserved for HioBuy internal IDs, so prefix your own (for examplepkg_MY-ORD-001). - Do not show mock numbers as real. The demo's capacity counters, vehicle IDs and customer names are fictional. Remove or replace them before showing the view to real customers.
- Desktop first. The scene targets modern desktop browsers. Plan a 2D fallback (the journey bar alone) for mobile.
Common errors
| Error | Likely cause | Fix |
|---|---|---|
403 FULFILLMENT_MODE_NOT_SUPPORTED | App is in self-fulfillment mode | Switch the app to HioBuy warehouse mode in the portal |
401 INVALID_API_KEY | Missing or wrong key on your backend | Check the server environment variable; never ship the key to the browser |
404 PACKAGE_NOT_FOUND | Wrong id, or an unprefixed external id | Use the pkg_* id returned by inbound create, or a prefixed external id |
Stage stuck at receiving | Package has no later events yet | Expected; the package has not been put away or consolidated |
| Brand change not visible after deploy | NEXT_PUBLIC_* is inlined at build time | Rebuild with npm run deploy |
Next steps
- Open the live demo and follow the package once.
- Fork hiobuy/warehouse-journey-3d, set your brand, and deploy it.
- Add the backend adapter and test it with the
sb_pkg_shippedsandbox package. - Read the HioBuy Fulfillment Integration Guide for when to call Inbound, Packages, Value-Added Services and Shipments.
API reference: https://hiobuy.com/api-docs.
Next step
If you already understand the workflow, move to the API reference for exact request and response fields, or open the developer console to create your application.
Ready to build?
Open the API documentation or create your HioBuy developer application.